Tuesday, September 27, 2011

The Flat-Belly Workout


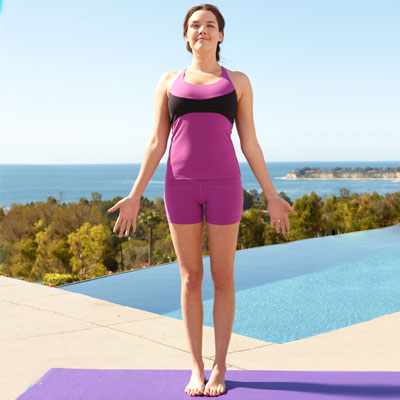
Drop 2 inches in 4 weeks
“This workout is so effective because it’s about quality, not quantity,” Bethenny says. Each move targets not only the abs but other muscles, too, adds trainer Kristin McGee, who helped create this regimen (and joins Bethenny on her Body by Bethenny DVD): “With Bethenny’s hectic schedule, it pays to have an ab workout she can do anywhere.” 

To drop up to 2 inches in just 4 weeks, McGee says, do these moves 3 times per week, plus 20-minute high-intensity intervals 3 times per week and 45 minutes of moderate intensity cardio 2 times per week.
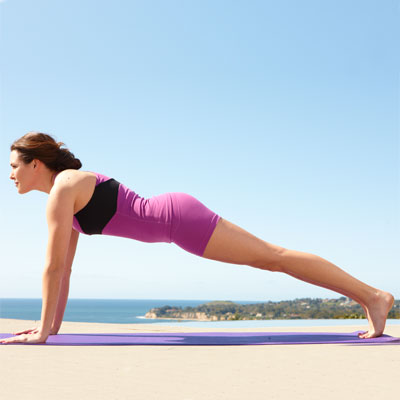
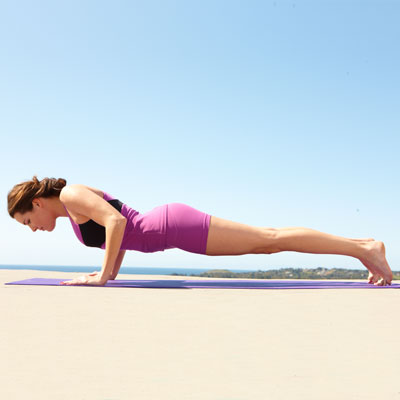
Plank
“I’m all about this one-stop-shop move: It not only tones my entire core but also strengthens and sculpts my arms, butt, and thighs.” 

Kneel on a mat on all fours with your hands directly under your shoulders. Stretch your legs back one at a time to come into plank position (the “up” part of a push-up); engage your ab muscles. Your body should be long and straight; don’t let your hips sag or lift your butt too high. Imagine there’s a seat belt tightening around your waist, drawing your lower-ab muscles inward. Press your hands firmly into the mat, and press strongly back through your heels. Hold for 1–2 minutes (or as long as you can), then drop back to all fours. Do 3 reps.


Side Plank
“This is an awesome way to tone my waist and tame love handles. Plus, it gets rid of dreaded bra bulge!” 

From plank position, press your right hand into a mat and turn your body so your weight is on the outer edge of your right foot; stack your left foot on top. Imagine you have a big beach ball under your right side; press your torso up and away from the ball, extending your left arm with fingers pointed toward the sky. Tighten your lower-ab muscles and brace your entire core. Hold for 60 seconds, then return to plank position and repeat on the left side; that’s 1 rep. Do 3 reps.


Boat Pose
“This is my go-to pose for fighting lower-belly pooch—an area that can be really hard to tone, especially after you’ve given birth.” 

Sit with your knees bent, feet flat on a mat, and hands on the ground. Lean your upper body back and lift your legs so your body forms a V. Stretch your arms forward, palms facing in. Tighten your lower-ab muscles while keeping your shoulders relaxed, back straight, and chest lifted. Lengthen your legs and engage your inner thighs. Hold for 5 slow, deep breaths, then lower your legs. Do 3 reps.
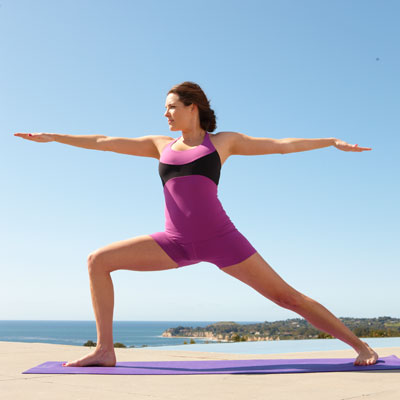
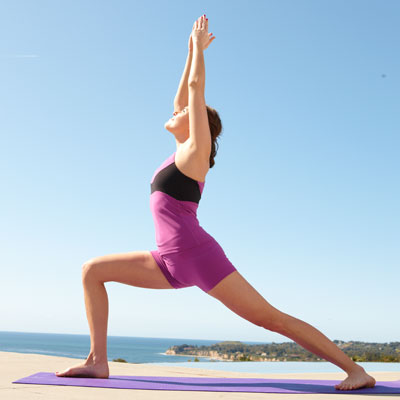

Swaying Warrior 2
Stand in a wide straddle on a mat. Turn your right foot out 90 degrees and your left foot in 45 degrees. Bend your right knee (keep it over your ankle) so your thigh is parallel to the mat. Press firmly into your outer left foot and inner right foot, and use your inner thighs and lower abs to hold the pose. Stretch your arms out to the sides, then slide your left arm down the back of your left leg and reach your right arm overhead. 

Lift up and all the way over until your right elbow comes down to your knee; stretch your left arm over your ear. Repeat 2 more times. On the last one, stay in the final position for 3–5 breaths before coming up and repeating on the other side.


Scale Pose
“I’m a fan of this efficient move not only for its core (and arm!) strengthening but also because it’s a great way to strengthen your pelvic floor—and that helps in everything from better sex to better posture.” 

Sit in a comfortable cross-legged position with hands on a mat next to your hips. Tighten your pelvic floor (as if you have to pee and are holding it in), push into your hands, and lift your entire lower body off the mat. Hold for 3 breaths, then lower back down. This is a pretty challenging move, so if you can’t lift your whole lower half, keep your feet on the floor and just lift your butt. Do 3 reps.

Monday, September 26, 2011

Lose Weight: Fat Burning Yoga Workout


Lose belly fat with these fat burning yoga exercises

by Women's Health Magazine


Crush calories with heart-revving yoga.

You contort into all kinds of wacky positions wriggling into those skinny jeans. Bend and twist on a regular basis and that might not be necessary. An active sequence of yoga flows — a form called vinyasa — burns more than 450 calories an hour, according to Sara Ivanhoe, host of 20 Minute Yoga Makeover: Weight Loss.

These two flows provide a total-body workout. Repeat each one 5 to 10 times.


Backbend

Stand with your feet hip-width apart. Lace your fingers behind you (palms facing up). Inhaling, bend from your upper back, lift your chest, and press your shoulders down.

Forward Bend

Soften your knees and bend forward as you exhale, letting your torso hang in front of your thighs. Keeping your arms straight and fingers locked together, lift them up and over your head (ultimately reaching toward the floor in front of your feet).

Chair

Inhale and bend your knees into a squat. Unlock and straighten your fingers, then separate your arms. When your thighs are nearly parallel to the floor, move your arms toward your ears. Keep your weight on your heels. Inhale, stand up, and lower your arms to your sides. Exhale.

Downward-Facing Dog

Get on all fours, lift your hips, and straighten your arms and legs.

Plank

Inhale as you shift forward into the top of a pushup position with your arms straight. Exhale, bend your elbows (keep them pointing back and hugging your body), and lower your body until your chest is on the ground.

Cobra

Uncurl your toes so the tops of your feet are touching the ground and press your tailbone down. Hug your elbows in as you inhale, straighten your arms (keep a slight bend), and lift your chest off the ground. Exhale as you gently release your body back to the ground. Inhale, curl your toes under, and press your hips up and back into downward-facing dog. Exhale.

Last updated: February 1, 2011 Issue date: September 2006

Yoga for Your Jiggly Bits

Firm up

jiggly-bits
By Su Reid-St. John
From Health magazine
We all have one or two problem areas that are hard to firm up—hello, chicken arms—but that we long to get rid of for good. Solution: this fun, flowing yoga routine designed to tone your toughest bulges while giving you loads of energy. (Just want to focus on a single trouble spot? Look for the move or moves for that area, and hold the pose for as long as you can.)
This Vinyasa-style routine was created by Mark Blanchard, the Los Angeles–based yogi behind the popular True Power Yoga DVDs who’s helped shape the bodies of Jennifer Lopez, Drew Barrymore, and Lucy Liu. Follow his 25-minute sequence 4 times per week, and in 3 weeks you’ll be much firmer all over. Now that’s worth unrolling a mat for!
mountain-pose

Mountain Pose

Opener
Stand tall with feet together, equal weight on both your feet, arms by sides. Inhale and exhale through your nose 5 times.
forward-bend

Standing Forward Bend

Stretches back and legs
Inhale as you reach your hands up toward the sky, then exhale and bend at the waist to fold over your legs, reaching toward the ground (hold your calves, if it feels comfortable; shown). Hold for 5 breaths, concentrating on lifting your quadriceps (don’t lock your knees) and letting your upper body hang.
plank-yoga

Plank

For muffin top and bat wingsExhale as you put hands on the ground (bend your knees, if you need to), and walk your feet back to Plank position (shown here). Your feet should be hip-width apart, with your hands directly under your shoulders. Keep your belly firm and hips lifted as you press through your heels. Hold for 5 breaths.
low-plank

Low Plank

For bat wings and flabby thighs
Inhale as you bend your arms to lower to Low Plank position. Hold for 1 breath.
upward-facing-dog

Upward-Facing Dog

For bra bulge and back fat
Exhale as you lower your body to the mat, with hands still under your shoulders and the tops of your feet on the mat. Inhale as you press up through your hands to Upward-Facing Dog, lifting your knees if you’re able (shown at left). Keep your shoulders down and away from your ears, chest open, and fingers spread. Hold for 3 breaths.
down-dog

Downward-Facing Dog

Stretches back and legs
Inhale as you tuck your toes and push back up into Low Plank, then exhale as you lift your hips and thighs and straighten your arms (don’t lock your elbows), moving into Downward-Facing Dog position (shown). Keep your hips lifted high as you press your heels down. Hold for 5 breaths.
warrior-pose

Warrior 1

For pudgy hips
Keeping your hips square, inhale as you lift your right leg back, then bend your knee and step your right foot forward. Come to standing with your left foot turned out 45 degrees and left heel centered behind your right foot. Face your hips forward and stretch down over your right leg, arms reaching down on either side of the leg. Bend your right knee to 90 degrees, and lift your arms up overhead (hips still facing forward) into Warrior 1 position. Hold for 1 breath.
warrior-2

Warrior 2

For low-belly pooch
Inhale as you straighten your right knee, then exhale as you bend it again, twisting your torso toward the left and lowering your arms so that the right arm is straight out in front of you and your left arm is straight out behind you (shown above). Hold for 1 breath.
extended-triangle

Extended Triangle

For flabby thighs
Inhale as you straighten your right leg and hinge forward at the hip to come into Extended Triangle pose, bringing your right hand to your shin, ankle, or the floor and raising your left hand straight up into the air. Hold for 1 breath.
lifted-triangle

Lifted Triangle

For love handles
Keeping your legs strong and belly firm, inhale and reach both hands forward. Bend your right knee and reach your right shoulder toward it, then straighten your leg as you raise back up (shown above). Bend and straighten 2 more times, then turn your chest toward the ground and fold over your straight right leg; hold for 5 breaths. Inhale as you bend both knees, and return to Plank position. Hold for 1 breath. Do steps 3–10 on the left side, then repeat the whole series (steps 3–10 on each side) 2 more times.
chair-pose

Chair Pose

For saggy butt and flabby thighs
From Plank position, inhale as you step your right foot forward, followed by your left. Slowly rise halfway up, lifting your chest and bringing your arms overhead. Sink back into your hips (be sure to keep your knees behind your toes), as if sitting in a chair (shown). Keep your back straight, and tuck your tailbone. Hold for 10 breaths.
standing-chest-lift

Standing Chest Lift

For back fat
Inhale as you slowly return to standing. Exhale as you wrap your hands around the top of your hips and butt with your thumbs at your tailbone. Lift your chest as you gently push your elbows back and in toward each other, bringing hips forward and arching your back. Hold for 5–10 breaths.
forward-bend

Standing Forward Bend

Stretches back and legs
Release. Inhale as you reach your hands up toward the sky, then exhale and bend at the waist to fold over your legs (shown below). Hold for 3 breaths, letting your upper body hang like a rag doll.

Sunday, September 25, 2011

The Best Yoga Poses for Chronic Back Pain


Skip the aspirin and acetaminophen and treat your back pain with these poses.

You don't need to pop a pill every time you have aches and pains. Over the counter pain relievers come with tons of packaging and they are just another ineffective quick fix. Instead, try a natural long-term solution.


Legs Up the Wall
One of the main causes of back pain is tightness in the hamstrings. A good way to gradually open up the hamstrings is to put your feet up the wall. First, lay on your back in front of a wall. Roll up a towel and place it under your shoulders. Fold another towel and place it under your head. Move your bum as close to the wall as you can and then send your feet up the wall sideways. You want to avoid leaving a lot of room between the sacrum and the wall. Stay in this position for about five to 10 minutes. This pose is great right before you go to bed because it helps to relax the body and mind.


Child's Pose
This is great for decompressing the spine and slowly breathing space into the vertebrae. The pose works especially well on the back because it?s therapeutic and you can stay in it comfortably for a long period of time. First, sit on the floor with your legs folded underneath your body so that your bottom is resting on your ankles. Lean forward and place a folded towel under your forehead. Slide back onto your ankles and then fold forwards onto the mat. Place the arms with the hands facing up beside the body. Close the eyes and follow your breath.


Crocodile Twist
Lay on your back and bring your legs above your body with your knees bent at about 90 degrees. Rotate your body to one side with your arms open. Face the opposite way that your knees are facing in a gentle twist. You can even roll up a towel and place it under your neck or fold up a towel and place it under your head if it makes you more comfortable. Then just switch to the other side.

Mudra for Weight Reduction


Surya Mudra

Method : Fold the ring finger holding it from thumb which has to press down keeping the other fingers straight and place the hands on the knees and palms facing the sky forms Surya Mudra. Do this for 20 to 30 minutes followed by Prana Mudra for 10 minutes. Surya Mudra can be practised while walking also. It can be practiced in other times as well.


Benefits: 
1) increases heat in the body as sun is the giver of energy.
2) increase of heat dissolves the fat stored in body cells
3) improves digestion & reduces obesity due to excess fat
4) all problems of thyroid gland reduces or eliminated
5) sometime due to thyroid , menses abnormalities are caused, which reduces.
6) decreases mental heaviness
7) reduces chlorostral , constipation
8) helpful in diabetes, TB, ASTHAMA
9) balances body.

Earth element will be reduced by doing this.  Cholesterol accummulated in the body will vanish thereby reducing the unnecessary weight.  Problem of phlegm, sinusitis, cold, pneumonia, TB, asthma can be cured. Do this mudra followed by Linga Mudra for 7 to 8 minutes for better results. Digestion will improve.  You will live in enthusiasm.  Efficiency in the working of thyroid gland will increase.

Caution : Persons with weakness should NOT do this mudra. If above problems are found, do this mudra for a minute, see the result, if no difficulty is experienced, then practise this, that too for a little time only.

Linga Mudra


Method : Interlock fingers of both hands keeping one thumb in erect position and other thumb coming round the first one as shown in the figure.  Do this for 5 to 6 minutes.


Benefits: Since many acupressure points are pressed simultaneously, efficiency of heart, thyroid gland, lever, neck will increase.  If you do this during winter, body will get heated up in a few minutes.  Diseases like cough, cold, sinus, asthma, pneumonia, TB will be cured.  Diseases that recur during weather change will vanish.  Cholesterol and proteins are melted which help in decreasing body weight.  Do this followed by Surya Mudra to control increasing body weight.  Solar plexus will come to its original place and digestion will be normal. For details of solar plexus, see page No.73.

Attention : By doing Linga Mudra, body gets heated up.  Hence please drink sufficient water.  And also take fruit juice, milk, buttermilk, lemon sharabath, etc. to avoid ill-effects of this mudra.

Caution: People suffering from Pitha (Bile) related problems should NOT do this mudra. Please note that those who suffer from acidity, giddiness, ulcer don’t do this. When there is cold, phlegm, do this for 2 minutes only and stop immediately after the problem is averted.

Digestive Aid (5 minutes sequnce)


This sequence is done on your back so it is nice and easy on the body. A combination of twists and pressure encourages blood flow to your core region, aiding digestion, elimination and detoxification.

Repetition
Repeat on other leg

Warm up-Restorative

FULL SUPINE STRETCH  


Start Position:
Reclined

Description:

Beginning from Corpse Pose. Inhale and lift both arms up and overheard until the back of the hand touch the mat behind you. Ensure that the back remains planted on the mat and does not arch. Flex your feet and lengthen the back of your neck by slightly tucking your chin. Inhale and feel the body get long, stretching the fingers tips away from the heels. On the exhale, soften and relax everywhere. Continue to the rhythm of your breath for 4 breath cycles.

Contraindication:

Shoulder Injury

Benefits:

Awakens the body, starts energy flow

 KNEE DOWN TWIST POSE  (SUPTA MATSYENDRASANA )


Start Position:
Reclined

Description:

Starting in Corpse Pose. Begin by bringing the inner edges of the feet together, bend the right knee and place the right foot just above or beside the left knee. Airplane the right arm out to shoulder height, placing the other hand on the outside of the bent knee and ever so slowly lower the right knee to the left side. Ensure that both shoulder blades remain planted into the mat. The knee doesn’t have to touch the mat whatever is most comfortable for you. Gaze back at your outstretched arm and hold here for several breaths. Be sure to repeat on the opposite side.

Contraindication:

Back Injury, Knee Injury, Shoulder Injury, Hip Injury

Benefits:

Gently opens sacrum, releases tension in spine, calms nervous system, aids digestion

RECLINED BIG TOE POSE  (SUPTA PADANGUSTHASANA )


Start Position:
Reclined

Description:

Beginning from Corpse Pose, begin to bend your knees and plant your feet hip width apart on the mat. Straighten out your right leg grabbing behind the calf or thigh; whichever is the most comfortable for you. A strap looped around the arch of your top foot may help you to keep your torso planted on the ground. Ensure that you keep your tailbone rooted on the mat and keep the back of the neck long, by tucking your chin slightly toward your chest. Straighten out your right leg as much as possible, keeping the shoulders planted. Exhales allow you to gently deepen the stretch. For an added challenge, extend your left leg, pressing your thigh evenly and gently into the mat. Hold here for several breaths and then repeat with other leg.

Contraindication:

Hip Injury, Knee Injury, Back Injury

Benefits:

Stretches hamstrings, relieves sciatica

 RAISED KNEE TO CHEST POSE  (EKA PADA PAVANA MUKTASANA )

    Start Position:
    Reclined

    Description:

    Beginning from Corpse Pose, engage your core, bend your right knee and draw it into your chest.Gently lengthen out the back of the neck by tucking the chin into the chest. Interlace your fingers and squeeze into torso, if your knee has a healthy range of motion you may feel more comfortable moving you interlaced fingers down more toward your ankle area. On the exhale using the isolated strength of your biceps squish your calf into your thigh and your thigh into your torso. Hold this for a few moments, making sure to relax your neck and shoulders as it is easy for tension to sneak up. Hold this for several breaths using your exhales to draw the leg in a little deeper and then repeat on the left.

    Contraindication:

    Back Injury, Neck Injury, Knee Injury

    Benefits:

    Aids digestion, stretches groin

    WIND RELIEVING POSE  (PAVANA MUKTASANA )


    Start Position:
    Reclined

    Description:

    From Corpse Pose begin to engage mula bandha and feel your abdominals pull in and down. One at a time bring your knees into your chest and loosely wrap you arms around them. Laying both shoulder blades into the mat, lengthen the back of your neck by gently tucking your chin into your chest. Relax everywhere and hold for several deep breaths. If you are feeling up to it, rock an inch to the right and an inch to the left, massaging your lower back with the mat. If you are performing this as a counter pose to a back bend, lift your head and neck and tuck it into your chest. Just like an armadillo.

    Contraindication:

    Hernia

    Benefits:

    Aids digestion, releases lower back, calming

    Yoga positions: Natural relief for PMS

    Ease monthly bloating, cramps and other symptoms with these targeted yoga moves.

    By Michele Bender

    From the July 2007 Issue

    Seated Twist

    Sit with legs extended. Cross left leg over right, left foot flat next to right knee. Bring right heel near left hip. Put left hand on floor by left hip. Inhale, wrap right arm around left knee and twist torso to left (as shown). Hold for 10 to 15 deep breaths. Return to start. Switch sides; repeat.


    Wind Pose

    Lie faceup. Bring knees to chest, reaching arms around shins; clasp hands (as shown). Keep lower back pressed into floor as you breathe slowly and deeply for 20 breaths.


    Cat Pose

    Start on all fours, knees under hips, hands under shoulders. Inhale, dropping chin to chest, tilting pelvis under while rounding back like a cat (as shown). Exhale, lifting chin toward ceiling and arching back in opposite direction. Repeat 10 times.


    Bow Pose

    Lie faceup with legs together, knees bent and feet flat on floor. Inhale, bringing soles of feet together as you lower knees to floor as far as you can. Place hands on inner thighs for help with stretch (as shown). Hold for five to seven deep breaths. Exhale, returning to start. Repeat three times.


    Crocodile Pose

    Lie facedown with forehead resting on stacked hands. Keeping upper body and butt relaxed, exhale as you pull belly button in and up off floor (as shown). Hold for two counts; inhale as you release belly back to floor and repeat for one rep. (If you experience discomfort in your lower back, place a rolled-up towel or pillow under ankles.) Do three reps.


    Bridge

    Lie faceup, knees bent, with feet flat and hip-width apart. Slowly press hips toward ceiling, forming a line from shoulders to knees. Keeping neck relaxed, clasp hands on floor beneath torso (as shown). Hold for 5 deep breaths, working up to 10 or 15. Release hands and lower torso to floor one vertebra at a time. Repeat three times.


    Thunderbolt


    Kneel. Sit back on heels with palms resting on thighs, keeping shoulders back and down (as shown). Maintain upright posture as you breathe slowly and deeply for 20 breaths.


    Half Shoulder Stand

    Lie faceup. Press palms into floor as you exhale, reaching legs toward ceiling. Bring hands to lower back to support weight (as shown). Hold for 5 deep breaths, working up to 15.


    Rag Doll

    Stand with feet hip-width apart, arms down. Bend at hips, arms and head dangling, knees soft. Grab right elbow with left hand and left elbow with right hand (as shown). Gently rock side to side. Hold for 10 deep breaths. Return to start by releasing arms and rolling up one vertebra at a time.


    Modified Cobra Pose

    Lie facedown with elbows bent and close to body, palms down. Inhale, simultaneously lifting chest and left leg until left foot is about 12 inches off floor (as shown). Exhale, lowering chest and leg to start position. Repeat with right leg for one rep. Do three to five reps.


    Child’s Pose

    Start on all fours, knees under hips, hands under shoulders. Exhale, slowly sitting back on heels as you bend at hips and round back to rest chest on thighs and forehead on floor. Draw arms back along floor to side of thighs, palms up (as shown). Hold for 20 slow, deep breaths.